SpringSecurity Demo
AI-摘要
切换
鸡哔你 GPT
AI初始化中...
介绍自己
生成本文简介
推荐相关文章
前往主页
前往tianli博客
Spring Security(安全框架)
能做到相同功能的还有过滤器和安拦截器,只是它们的代码太多,冗余,属于原生代码
和Shiro的区别:类不一样
简介: Spring Security是Spring的安全框架,底层是安全模块的技术,可以实现强大的Web安全控制,我们只需要引入 spring-boot-starter-security模块
WebSecurityConfigurerAdapter:自定义Security策略
AuthenticactionManagerBuild:自定义认证策略
@EnableWebSecurity:开启WebSecurity模式
Security的主要目标是:认证和授权(访问控制)
Spring Security主要做的是认证和授权功能 功能授权 访问授权 菜单权限 示例: 此项目环境 JDK:1.8 Spring boot:<spring-boot.version>2.2.1.RELEASE</spring-boot.version> Pom:
    <!--引入依赖-Spring Security 3.0.11-->
        <dependency>
            <groupId>org.thymeleaf</groupId>
            <artifactId>thymeleaf-spring5</artifactId>
        </dependency>
    <!--3.0.4-->
        <dependency>
            <groupId>org.thymeleaf.extras</groupId>
            <artifactId>thymeleaf-extras-java8time</artifactId>
        </dependency>
        <!--引入依赖-Spring Security End-->
        <dependency>
            <groupId>org.springframework.boot</groupId>
            <artifactId>spring-boot-starter-web</artifactId>
        </dependency>
        <!--导入spring-boot-starter-security 2.2.1-->
        <dependency>
            <groupId>org.springframework.boot</groupId>
            <artifactId>spring-boot-starter-security</artifactId>
        </dependency>
权限配置文件
/**
* @author lph
* @create 2020 -11 -15 15:29
* @EnableWebSecurity 开启拦截功能
*/
@EnableWebSecurity
public class SecurityConfig extends WebSecurityConfigurerAdapter {
/**
* @Override 重写父类方法
* HttpSecurity http安全策略
* 授权
*/
@Override
protected void configure(HttpSecurity http) throws Exception {
//认证请求 请求授权的规则 ‘/’是跳转到主页的请求
http.authorizeRequests()
//首页可以任何人访问,功能页有权限才可以 permitAll 是所有
.antMatchers("/").permitAll()
// ‘/level1/**’ 下的所有东西 只有v1角色能访问
.antMatchers("/level1/**").hasRole("v1")
.antMatchers("/level2/**").hasRole("v2")
.antMatchers("/level3/**").hasRole("v3");
//访问没有权限的页面就跳转到登录页面
http.formLogin();
//注销 logoutSuccessUrl是登出成功
http.logout().logoutSuccessUrl("/");
}
/**
* @Override 重写父类方法
* AuthenticationManagerBuilder
* 认证
* error: lang。没有id“null”的PasswordEncoder映射
*
* 意思是密码没有加密 加密:.passwordEncoder(new BCryptPasswordEncoder())
* 使用此项加密后需要在设置密码的时候选用加密方式
* new BCryptPasswordEncoder().encode("0000")
*/
@Override
protected void configure(AuthenticationManagerBuilder auth) throws Exception {
//1.auth.inMemoryAuthentication() 内存认证
//2auth.jdbcAuthentication() jdbc认证 数据库认证
auth.inMemoryAuthentication().passwordEncoder(new BCryptPasswordEncoder())
/**
* withUser 是那个用户 roles 角色
* 本行的是 给lph用户(内存用户)一个v1角色权限
* roles(String... roles) 所以可以给一个用户多个角色权限
*/
.withUser("lph").password(new BCryptPasswordEncoder().encode("0000")).roles("v1", "v2")
//根据and 来继续下一个用户的认证
.and()
.withUser("root").password(new BCryptPasswordEncoder().encode("root")).roles("v1", "v2", "v3");
}
}Controller跳转路径
@Controller
public class RotController {
@RequestMapping({"/", "/index"})
public String index() {
return "index";
}
@RequestMapping("/toLogin")
public String toLogin() {
return "views/login";
}
@RequestMapping("/level1/{id}")
public String level1(@PathVariable("id") int id) {
return "views/level1/" + id;
}
@RequestMapping("/level2/{id}")
public String level2(@PathVariable("id") int id) {
return "views/level2/" + id;
}
@RequestMapping("/level3/{id}")
public String level3(@PathVariable("id") int id) {
return "views/level3/" + id;
}
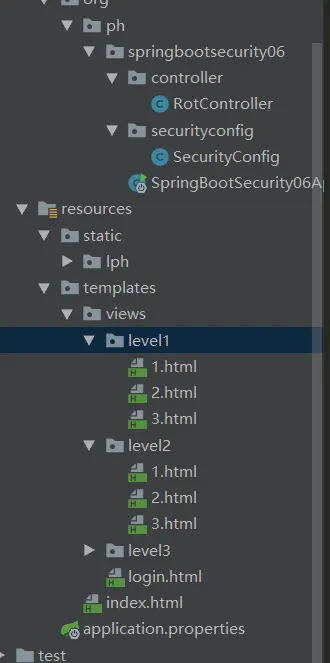
}项目结构图

小问题:
没有权限的登录后不应该看到不该看的页面 实现: pom依赖:需要配合thymeleaf前端类使用
<!--导入security与thymeleaf整合包-->
<dependency>
 <groupId>org.thymeleaf.extras</groupId>
 <artifactId>thymeleaf-extras-springsecurity4</artifactId>
 <version>3.0.4.RELEASE</version>
</dependency>
前端:
<!--未登录-->
<div sec:authorize="!isAuthenticated()">
<a class="item" th:href="@{/toLogin}">
<i class="address card icon"></i>登录
</a>
</div>
<!--以登陆 显示用户名和角色-->
<div sec:authorize="isAuthenticated()">
<a class="item">
用户名:<span sec:authentication="name"></span>
角色:<span sec:authentication="principal.authorities"></span>
</a>
</div>
<div sec:authorize="isAuthenticated()">
<a class="item" th:href="@{/logout}">
<i class="sign-out icon"></i> 注销
</a>
</div>但是会有版本问题: 解决将springboot版本降低 它支持2.0.X
> <spring-boot.version>2.0.9.RELEASE</spring-boot.version>此时注销问题:因为csrf问题 所以get有问题(明文传输不安全) post没有问题
> //关闭防攻击csrf功能http.csrf().disable();//注销http.logout().logoutSuccessUrl("/");根据权限显示元素
> <div class="column" sec:authorize="hasRole('v3')">记住我功能 实现:就是加了个Cookie 两周的时间
更改登录页面
1.http.formLogin().loginPage("/login"); //路径要和登录提交的路径一样 这样不经过Controller
//html
<form th:action="@{/login}" method="post">
2.//路径换成Controller的登录路径 此时表单接收不到
    <form th:action="@{/login}" method="post"> //非要走login的话要改变成
                  //此处的作用主要还是和提交路径一样                http.formLogin().loginPage("/toLogin").loginProcessingUrl("/login");
3.//完整的方式 加上传往后台的参数
//自定义登录页面 loginPage去Controller路径, loginProcessingUrl是登录认证的页面
http.formLogin().loginPage("/toLogin")
.usernameParameter("username")
.passwordParameter("password")
.loginProcessingUrl("/login");
//html
<form th:action="@{/login}" method="post">
<div class="field">
<label>Username</label>
<div class="ui left icon input">
<input type="text" placeholder="Username" name="username">
<i class="user icon"></i>
</div>
</div>
<div class="field">
<label>Password</label>
<div class="ui left icon input">
<input type="password" name="password">
<i class="lock icon"></i>
</div>
</div>
<input type="submit" class="ui blue submit button"/>
</form>最后 加上记住你
<div class="field">
<input type="checkbox" name="remember"> 记住我
</div>
//记住我 接收前台自己写的记住我的name
http.rememberMe().rememberMeParameter("remember");
本文是原创文章,采用CC BY-NC-ND4.0协议,完整转载请注明来自蒲公英阁
评论
隐私政策
你无需删除空行,直接评论以获取最佳展示效果


